
Here is a great how-to on converting a standard computer ATX power supply into a desk power supply:
http://www.wikihow.com/Convert-a-Computer-ATX-Power-Supply-to-a-Lab-Power-Supply
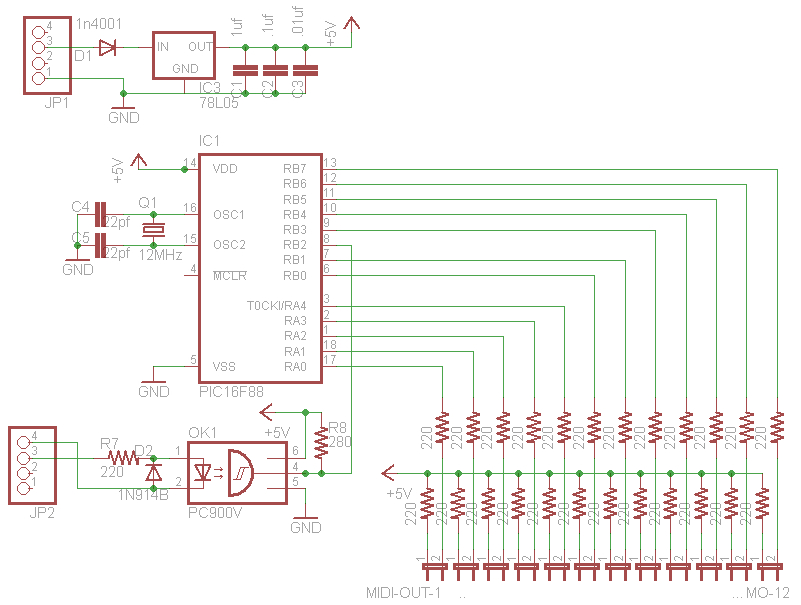
The ColorSynth v1.0 PCB can be used to make a 1 in, 12 out MIDI thru device:
Detailed instructions on assembly and firmware for 16F88 coming soon.
After removing the excess cabling, it is possible to house the MIDI thru device inside of a converted ATX power supply. You can also install several panel mount 5-pin din MIDI connectors into the chassis with one as an input, and the rest as outputs.
Key points:
1) Only use the 12V rail of the ATX PSU. Wire it to the DC+ pin of JP1 on the CS v1.0 PCB (use the pin next to the n/c pin), and also wire it to pin 3 of each MIDI out.
2) Wire ground to the GND pin of JP1 on the CS v1.0 PCB, and also wire it to pin 1 of each MIDI out.
3) Wire pin 4 of your MIDI in to pin 3 of JP2 on the CS v1.0 PCB.
4) Wire pin 5 of your MIDI in to pin 4 of JP2 on the CS v1.0 PCB.
5) Wire pin 1 of MIDI-OUT-1 (see schematic above) to pin 4 of your first MIDI out. Wire pin 2 of MIDI-OUT-1 to pin 5 of the same MIDI out.
6) Repeat step 5 as needed, using one MIDI-OUT from the MIDI thru device per MIDI out in your ATX PSU.